
Instructions with image
Where can I find instructions and tips?
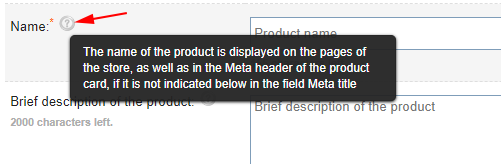
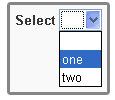
Use the built-in hints to edit any data. When you hover over the help icon, a tooltip will be displayed.
On each page of the control of any function there is an instruction or a link to the instruction.
The main list of questions is located in the Instructions.
You can use text search to find answers to most of your questions.
Key recommendations
Connect your own domain
Your domain is easy!
Websites with their own domain have more sales, as well as they are easier to promote on the Internet.
It's easy to use your own domain, while the cost of a domain is only $ 6 per year!
Connect your domains! Free parking - Connection instructions

Design
Use our design editor and design your site beautifully and conveniently for visitors. If you do not have experience in website design, then you can use our set of styles or templates and design a website in just a few clicks.
Structure

Below you will find practical examples of working with the most important functions of the Hotlist.biz service.
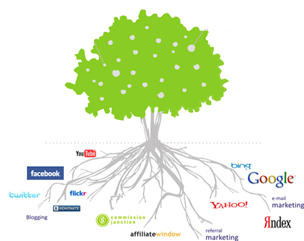
Advertising and promotion
Use initial guidelines for website promotion, or order promotion from our partners.
Website development
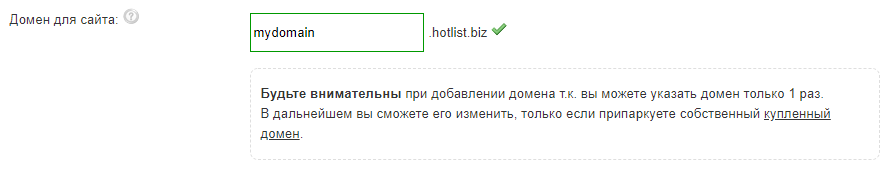
To begin with, in order to create your site, you need to register, fill in the data about you, and be sure to specify the domain. You can either park your own domain upon request, or connect a free domain in the "Domain for site" field.
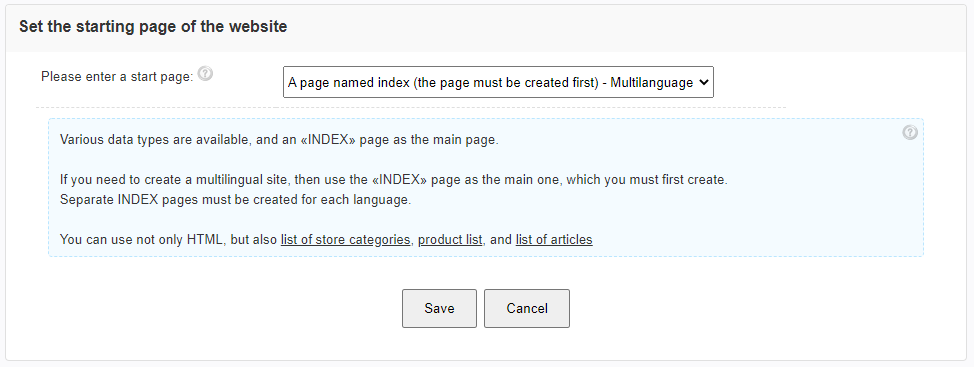
Setting the start page
You can set as a start page, a list of your products, a specific catalog category, an index page, or something else.
In the example, we'll look at setting up the index page.
How do I set the index start page?
First, you need to create a page named index. To do this, in the Admin Center, or in the Admin Panel, select "Pages" - "Add page".
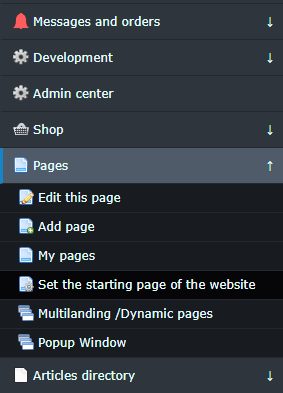

Now we will specify it as the main page. To do this, open the "Admin Panel" - "Pages" - "Specify the main page for the site".
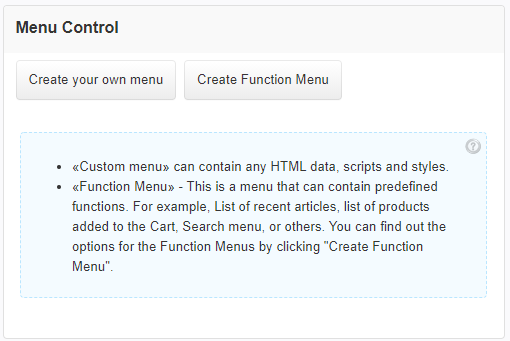
Menu Control
You can create and manage your own menus.
How to create a menu?
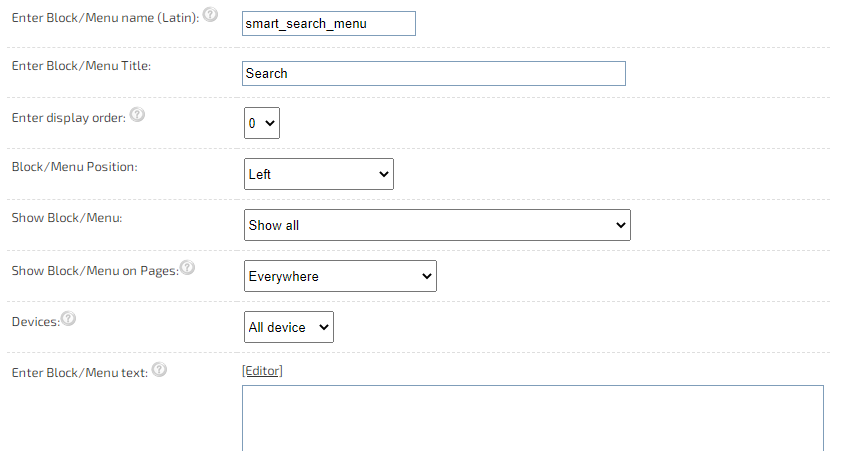
In the Admin Center, or in the Admin Panel, select "My Blocks/Menus" - "Add Block/Menu".

Paste the data into the menu and specify the location of the menu.
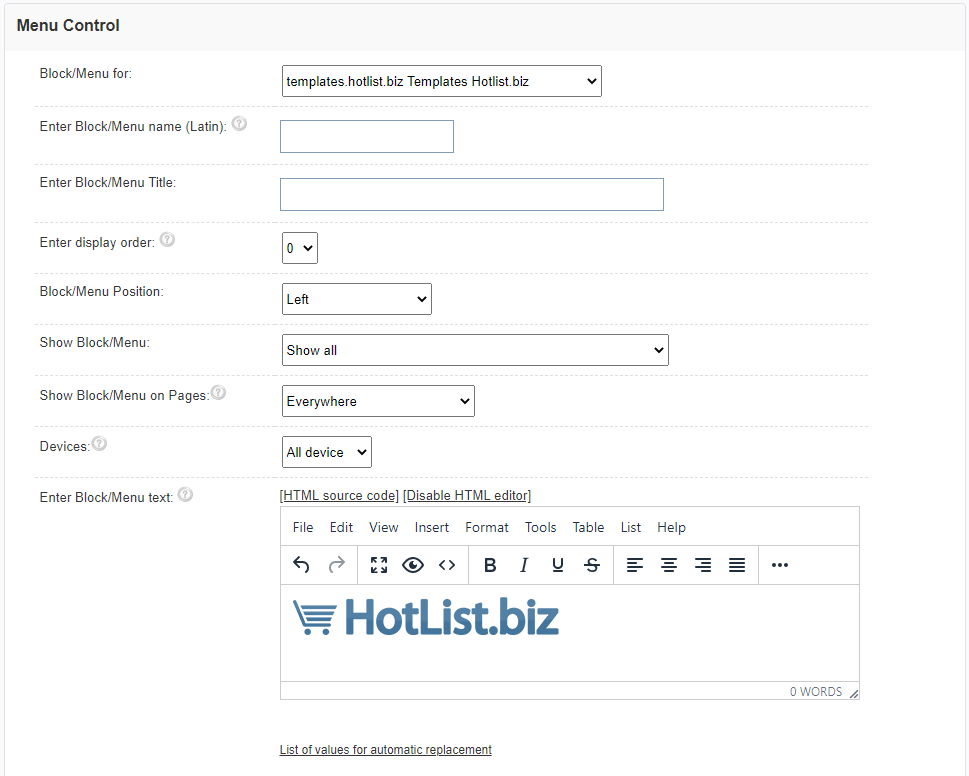
You can specify the position of the menu, as well as the pages on which to show or hide it. In addition to the standard position within the content, you can position the menu in the header or footer (bottom) of the site.
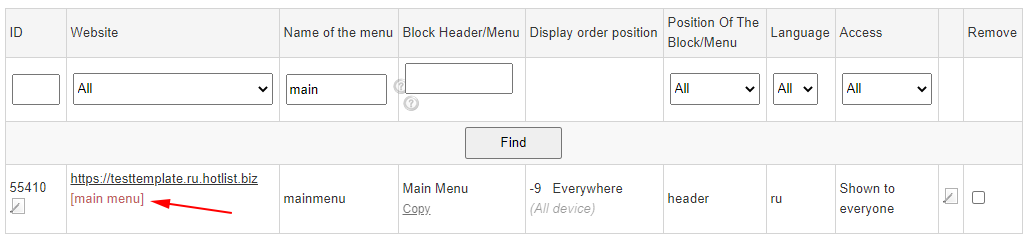
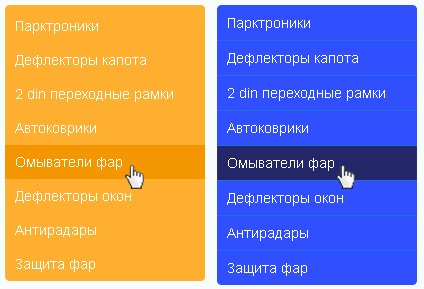
Main menu control
In the list of your menus, select the menu labeled "main menu".
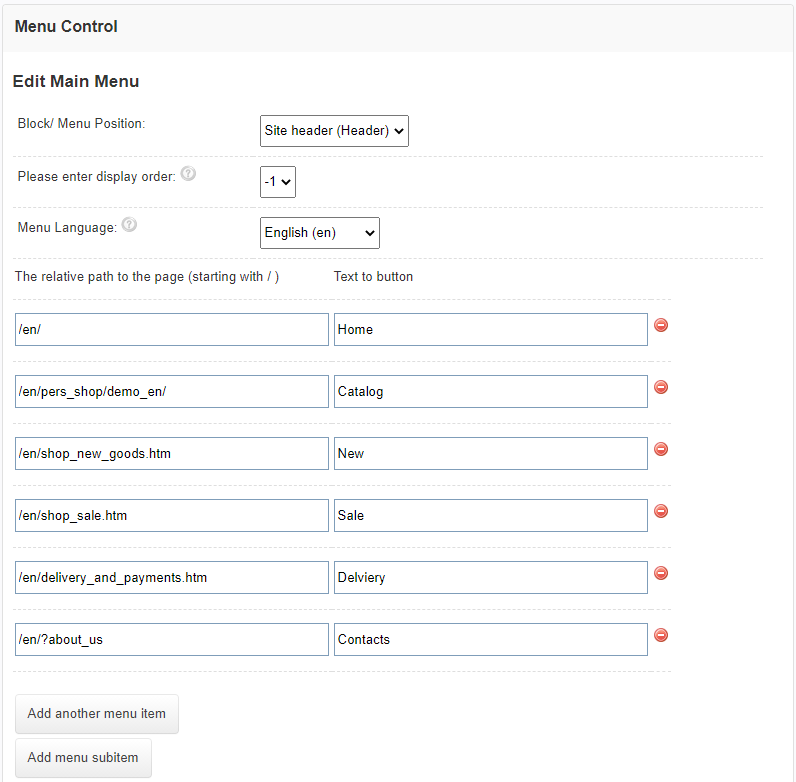

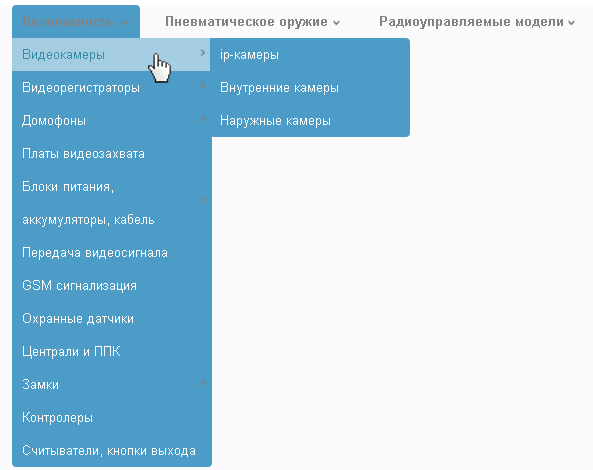
Paste in the code for the layered menu, and save the changes. For example, after inserting when from menu generator for store categories, we get the following menu.
Store Categories
You can create categories and subcategories.
Create a store category
To get started, we recommend that you create a main category in which you will create subcategories.
Open the store category editor in the Admin panel, and click "Add category".
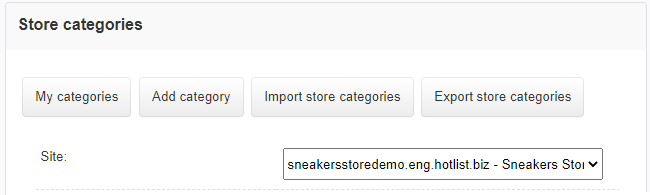
Select your site and click "OK".
Then enter the name (this will be the address for your category). For example, for the main category, create a group "Shop" name "Store".
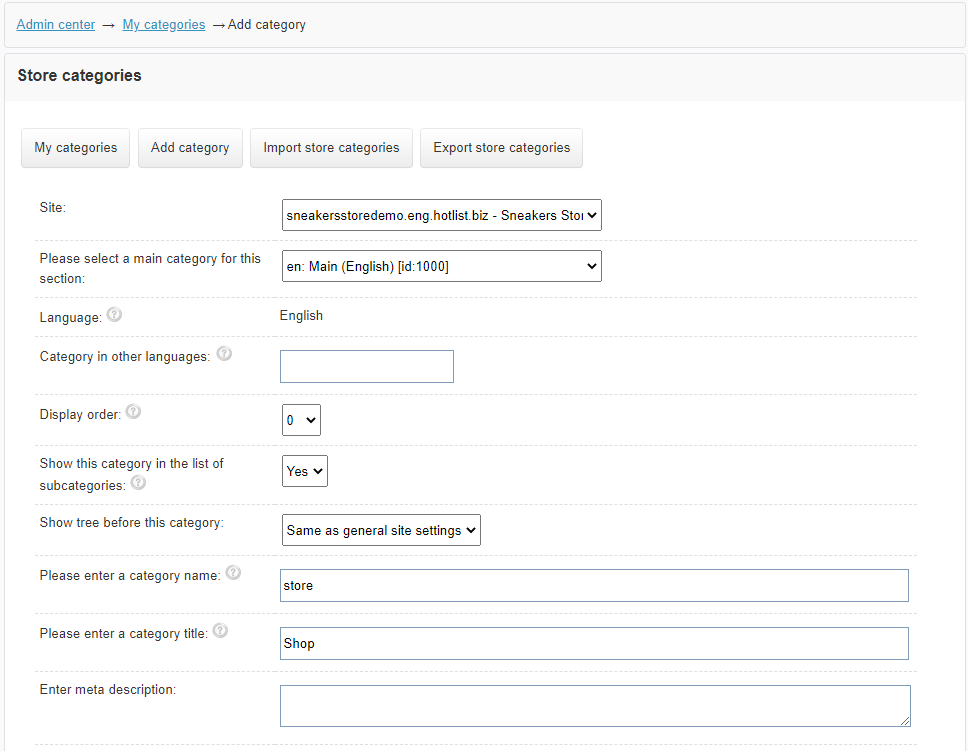
Select the main category, set a name and title for the category. If you have not created the main Category yet, then for a more convenient site structure, first create a "Store" heading in the language you need. If you set the name "store", then the created category in the address bar of the browser will have the following address http: // YOUR DOMAIN / en / pers_shop / shop /
You can add products to the created categories, as well as use Blocks / Menus, for example, with Search filters, specifying the path in which to display filters, dividing by product types and categories.
The category tree will contain "Store name"> "Store"> "Child category name".
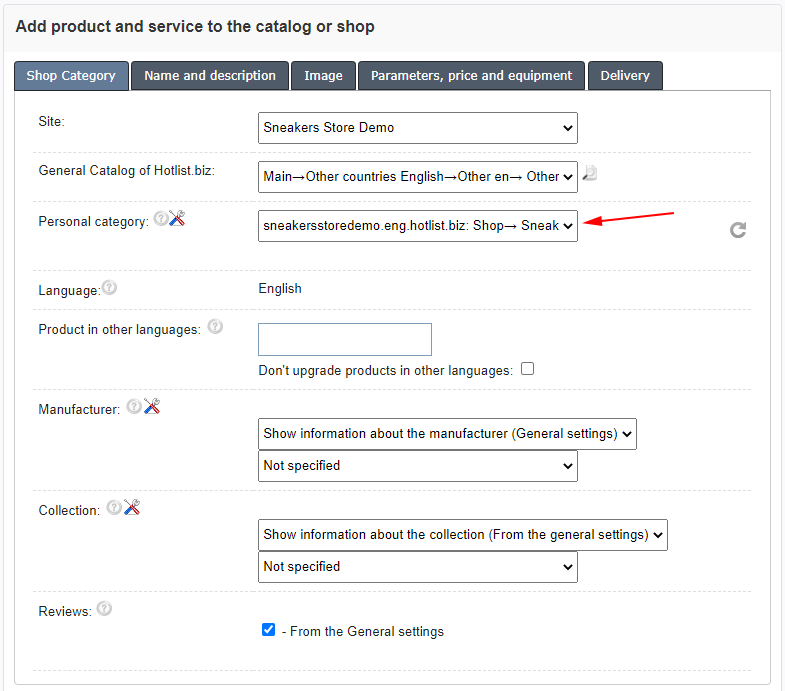
Setting a category for a product
After creating categories, you can specify them when creating a product in the line "Category".
Creating a list of categories for the menu
You can create a menu with a list of all categories, as well as the number of products in them.
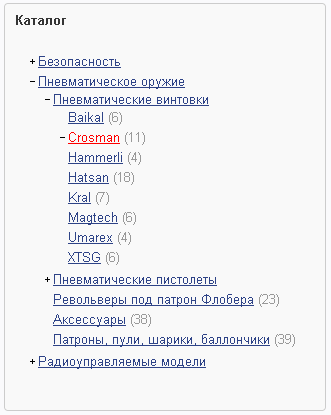
To create a menu with a list of categories, you can use the menu generator. To do this, in the Admin Center, or in the Admin Panel, select "Menu" - "Store categories widget".
Select the option you need to generate.
Copy the generated code (or the automatic replacement code [MENU....]) and paste it into a new menu that you can create in the "Menu Editor" and place it, for example, on the left.
When using the automatic replacement code in the menu, the list of categories and the number of products will be updated automatically.
Recommendations:
If you have created a personal "Store" category as the main one, you can use the "start-X" parameter so that the subcategories are immediately displayed in the menu. For more details see the Menu Generation page.
If you need to change the style of the generated menu, then use the htmlonly parameter, while Javascript and CSS style must be inserted separately. To do this, click "Generate ..." and after copying the JAVASCRIPT, paste it into any of your created menu (or create a menu). So that the created menu is not displayed in the view of the building block, it is enough to indicate its position in the Footer (Bottom of the site) or Header (Header of the site). The CSS code of the generated menu should be inserted into the "CSS Styles" tab in the design editor.
There you can also change the design of your menu.
If you place a block/menu with categories by generating it using the [MENU:shop_categories:start-0:vertical:htmlonly] code (specifying «vertical»), then this item will be added to the main menu in the mobile version. start-0 - you can replace it with the ID of the starting category.
If there is an item in the main menu with the same name as the title of the Block/Menu, then in the mobile version it will be replaced, and it will also be opened when you click on it. If there is no Item with the same name, then a block/menu with a list of categories will be added after the first item in the main menu. You can enable or disable the option to add Categories to the mobile version in the Design Editor, in the Main Menu tab - Mobile Button.
Product Types and Search Filter
What are product types and how to create them?
Product types are a way to separate different groups of characteristics. For example, you can create a Product Type - "Sneakers" and specify many parameters for it. In parallel, you can create many other types of products, for example: laptop, refrigerator, TV, clock and any others.
Let's create the Sneakers group as an example. To do this, open Admin Panel, Store, Product Types and Feature Values. Enter your site and fill in the Product Type name.
Let's add a few characteristics for example. For example, Color, Purpose.

To add a Feature, click "Add More Feature".
First, specify the names of the characteristics, because if you need to set predefined values, please save them first.
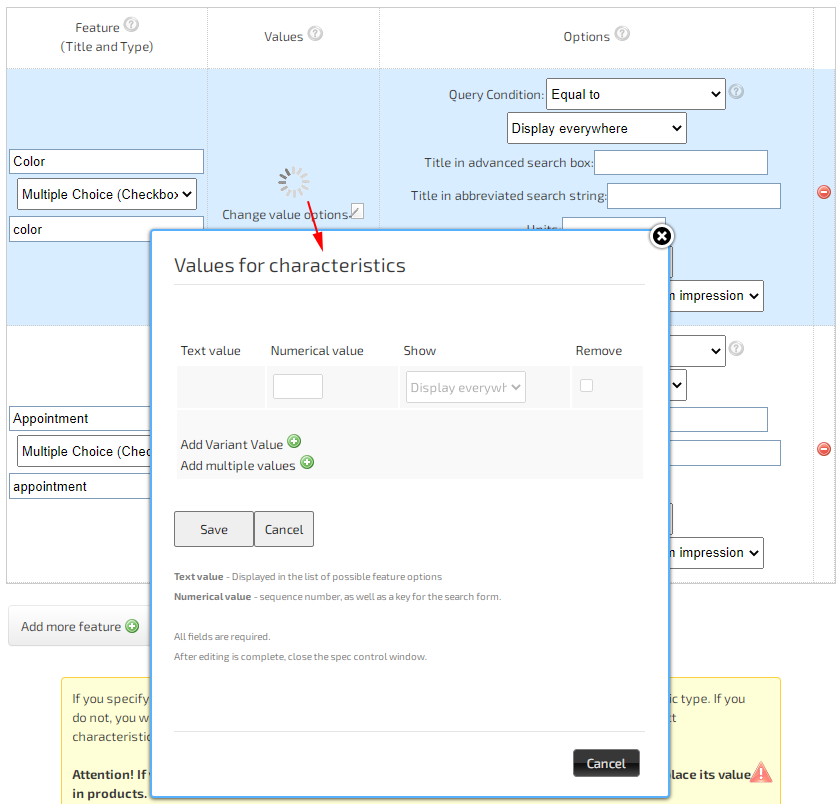
Now, for example, let's assign values to the "Color" property. Open the product type you created and click Change Value Variants. Enter values and click save.

Specify the characteristics of the product
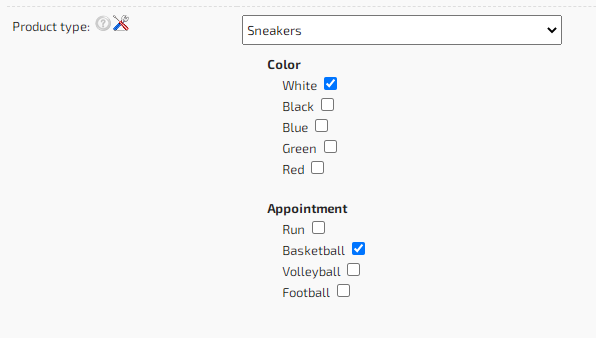
When adding a product in the "Product Type" line, select the desired product type.

When you change the product type, a list of possible values will automatically appear.
Once you have created product types and defined characteristics, you can create your own search filter with which you can search for your products.
Field types for characteristics
You can create different types of fields to be used in the search form.
Input - A one-line value in which you can enter any data that will be searched. For example, PRICE. Also, if this is a numeric value, then you can specify settings for the request, for example "Price from", then all products with a price higher than the one specified in the request will be displayed during the request. The price must also be set in the characteristics of the product.
Select - Many options for values, with the ability to select only one value.
Checkbox - Many options for values, with the ability to select multiple values.

Thus, creating various types of products, you can set a large number of characteristics and set possible options for values for them.
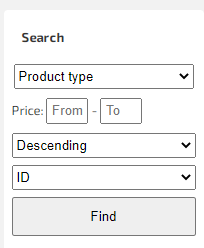
Search filter
The created product types and characteristics for them can be displayed in the form of a search filter. To do this, click "Create Menu" in the Admin Panel, in the "Menu" tab.
Clicking "Create Functional Menu" select "Search with Filter by Product Type"

Specify a position for the menu without changing its name. For example, let's display it on the left.
We now have a menu created.
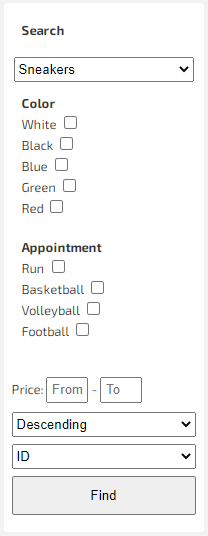
When changing the product type, the values of the characteristics will be displayed. Using them, buyers will be able to more quickly find the products they need.
In order to immediately display the filter opened for search, specify in the text of the block / menu «ID» of the created product type, as well as the text «autopath». For example «12345autopath».
Variety
You can add a wide range of varieties to your products. In the variety, you can specify any parameters, insert images and specify the parameters for changing the price. You can use your own values for each product. When adding a product, in the line "Variety", indicate the name of the variety, price and other parameters.
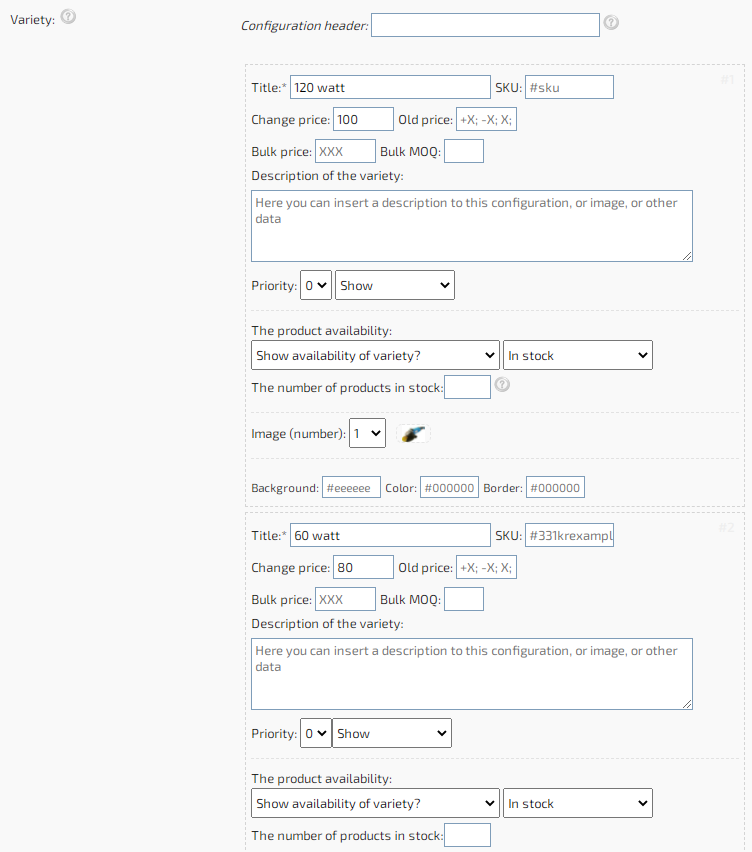
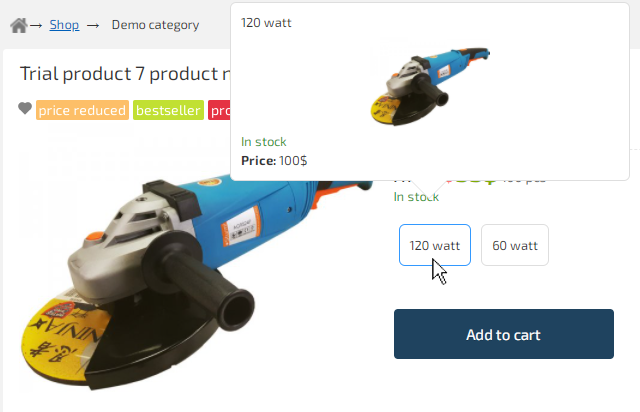
Thus, you will have a flexible system of parameters, and you will be able to sell various modifications of the same product (Color, Weight, Options and others).
Delivery
You can specify delivery parameters for each country, city and postal service.
By specifying the postal service, you can set the note and the delivery price.
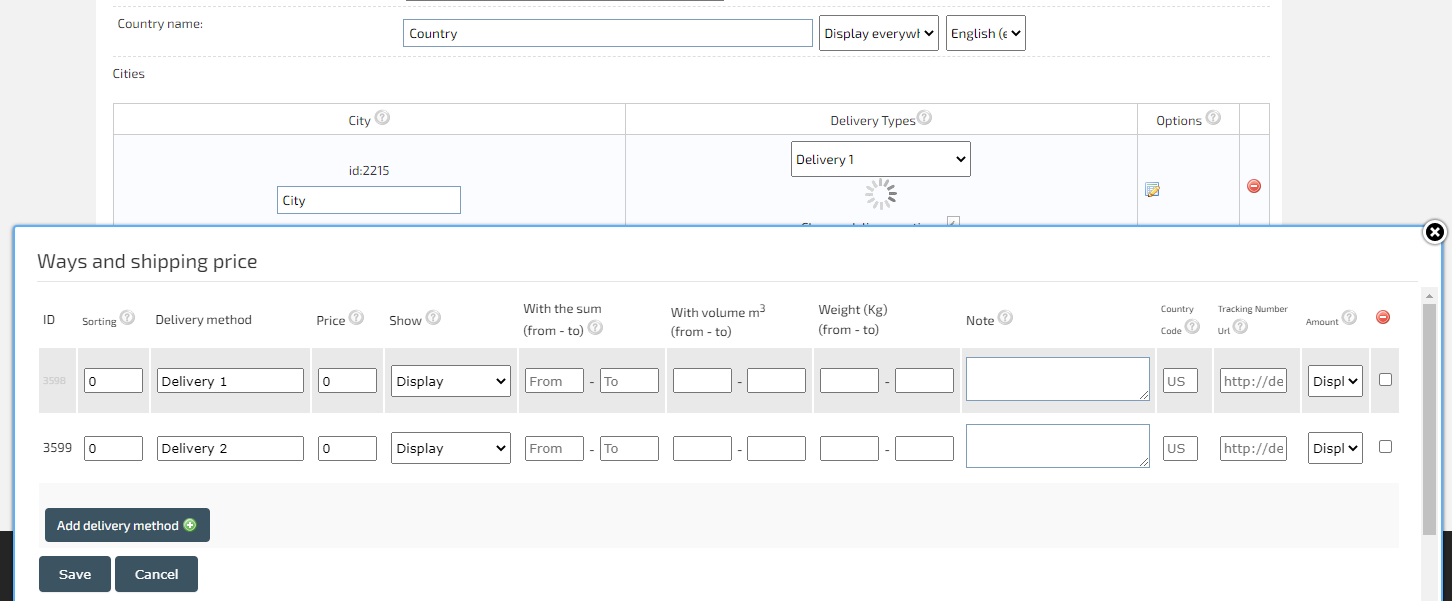
After specifying the country, add cities and save the changes. After that, you can set the values (list of possible delivery methods).
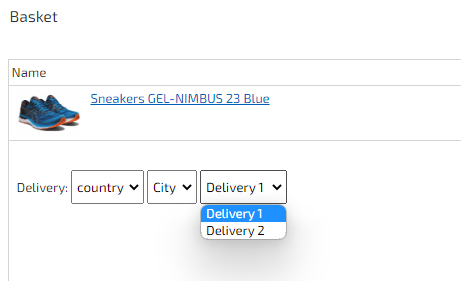
When placing an order, the buyer can choose the desired delivery service.
Additionally, a simplified editor of delivery methods has been implemented with the ability to change the fields required for filling. You can enable Choice of delivery method in the Checkout Form. This can be done in the settings, in the "Store", "Delivery" tab.
The currency in which the shipping cost is indicated corresponds to the main currency of the site. In order to change it, go to "Settings", and in the "Store" tab, specify the main currency for your site.
You can also individually arrange information on delivery methods for all goods or individually for each.
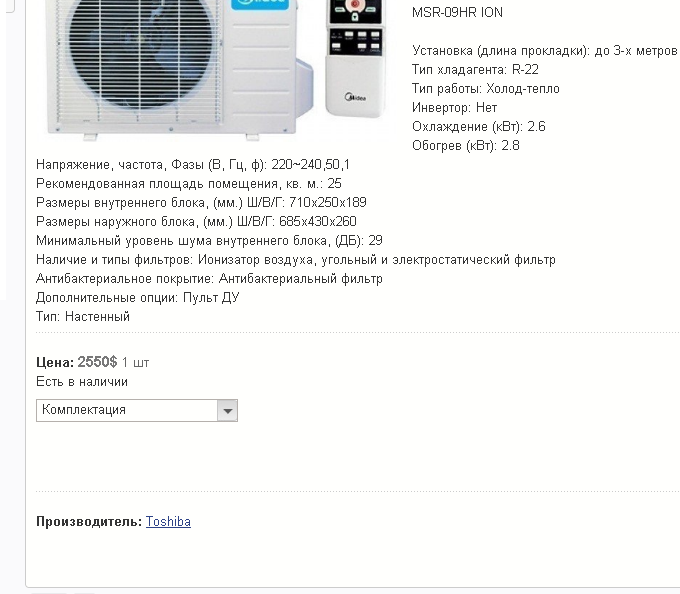
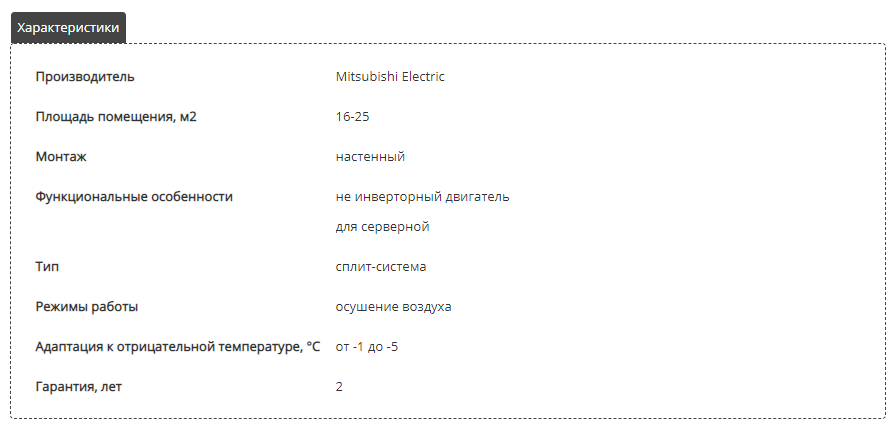
Manufacturers/ Producers
You can create your own list of manufacturers, and indicate them to your products. To create a brand (manufacturer), go to Amdinmenu, "Store", "Edit Manufacturers" and click "Add Manufacturer". Select a site and set a name for the manufacturer of your product.
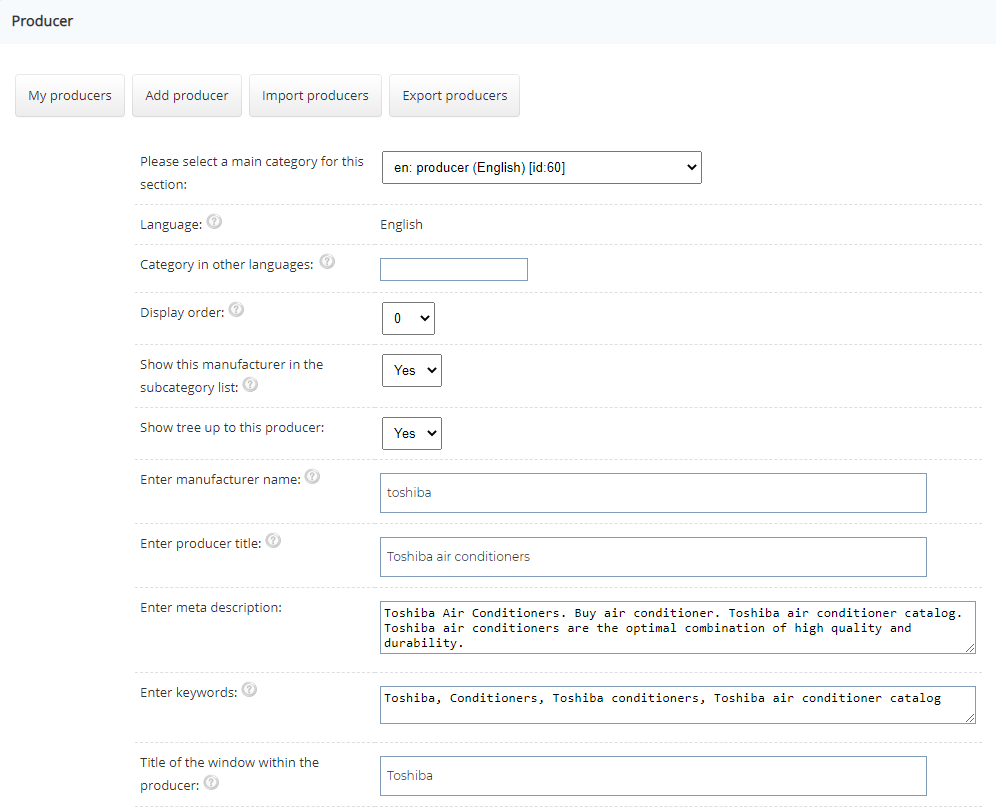
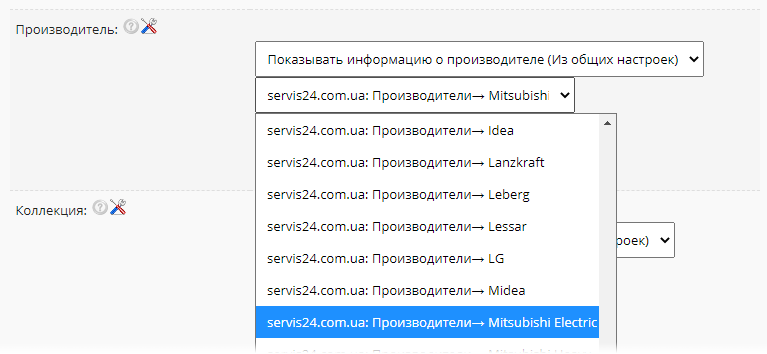
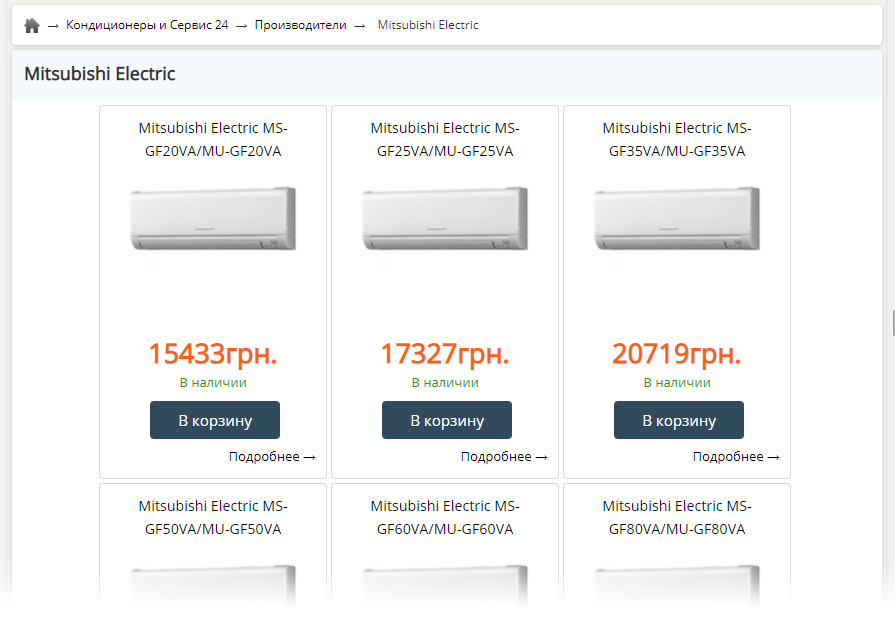

We recommend that you create a main heading called "Manufacturers" and add a list of manufacturers and brands to it.
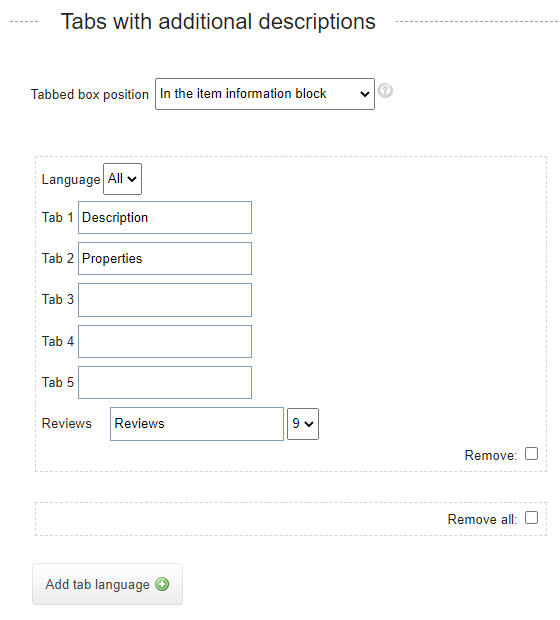
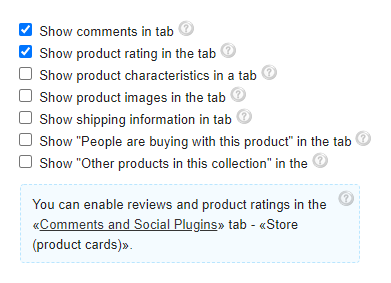
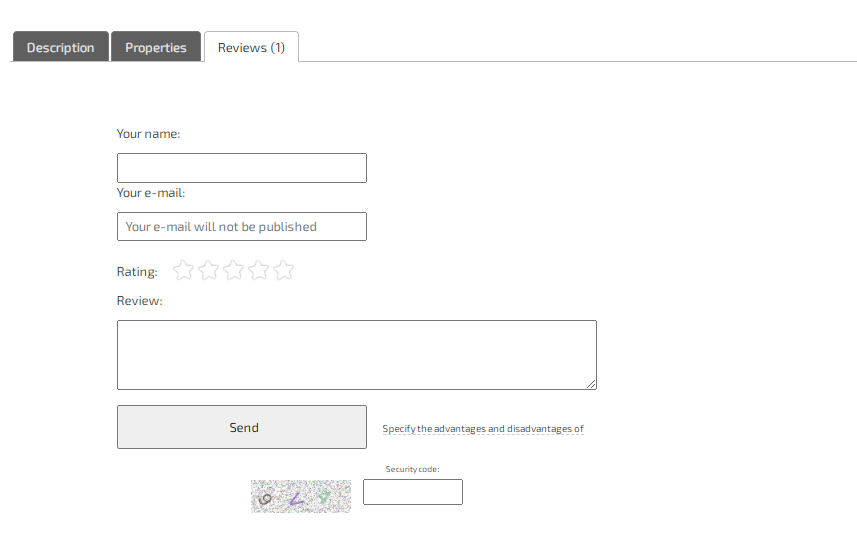
Tabs
You can use tabs to describe products.
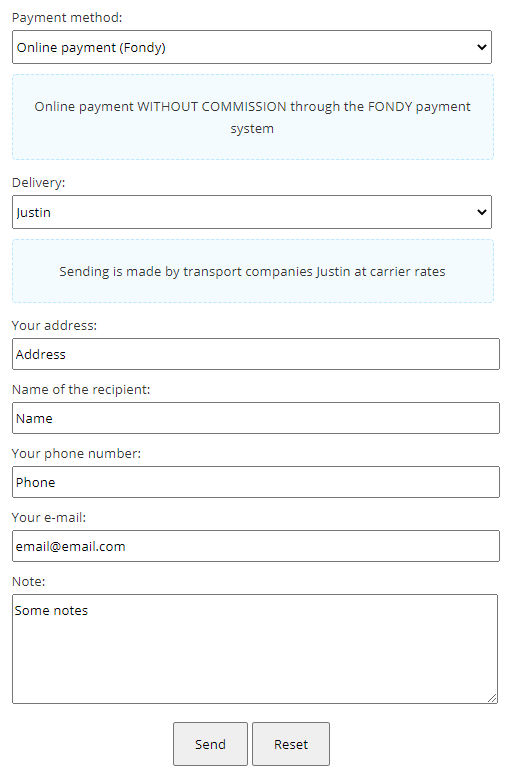
Forms to Submit
In addition to the usual built-in feedback form on your site, you can create full-fledged multifunctional forms for sending various data.
Form data can be sent not only to your site, but also to any third-party server. In the form, you can specify the type of data to be sent, and the type of encoding, and labels for buttons, and the text of messages in case of an error or successful processing, and specify a protective image, and much more.
Form fields can be flexibly configured, specify the check for compliance with the data type, mandatory filling, and much more ...
For example, you can create a form for ordering a site indicating the required fields:
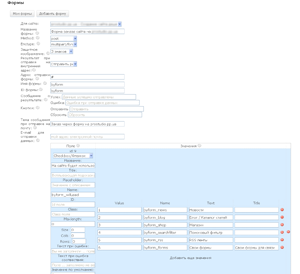
The result of the example form is shown in the image below.
